


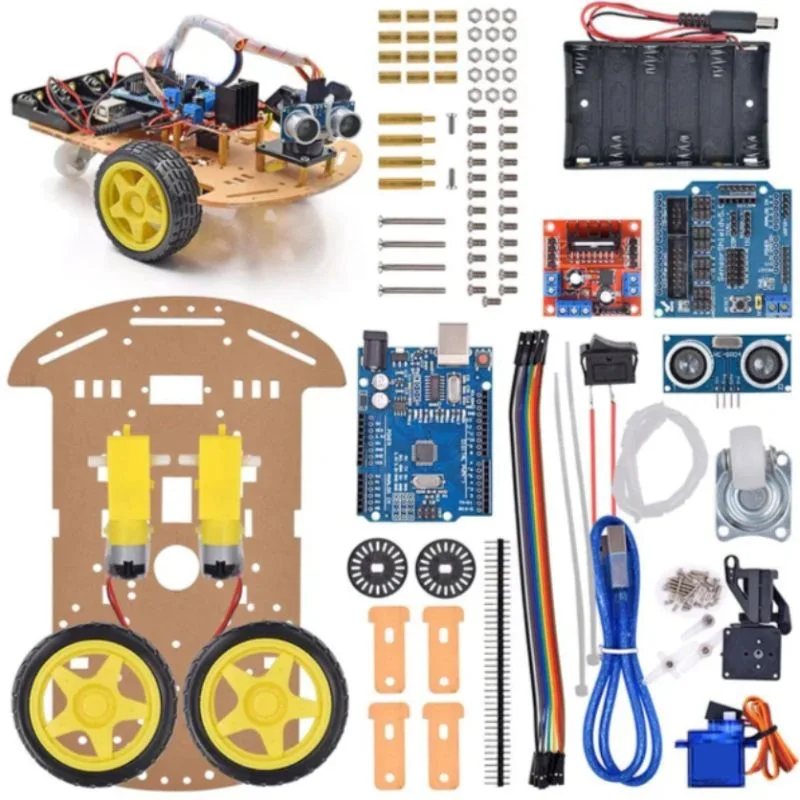

This robot car chassis kit is designed for makers, students, hobbyists and prototyping. It combines a mobile platform (chassis, motors, wheels) with sensors (for obstacle avoidance/tracking) and electronics modules (motor driver, controller board) so you can build a car-robot that can move, sense, avoid obstacles, track lines, etc. For example it’s marketed with “avoidance tracking motor … Smart Robot Car Chassis Kit … Speed Encoder … Ultrasonic module … for Arduino R3 kit”.
It’s suitable for learning robotics, robotics competitions, classroom projects, or DIY automation.
Key Features
Here are the standout features of this kit:
-
Chassis & drive module: Includes a metal/acrylic chassis, two drive wheels, one caster wheel, and a gearbox-reduced DC motor (48:1 gearing by default, optionally 120:1) for each wheel or a motor set.
-
Tracking & avoidance sensors: Includes modules like an ultrasonic distance sensor for obstacle avoidance, and “20-line gun code discs” (encoder wheels) for detecting wheel rotation/displacement or speed control.
-
Electronics interface: Comes with an Arduino compatible board (e.g., “R3 CH340” board) and an L298N motor driver module, a rocker switch, battery box, and other assembly hardware.
-
DIY/education friendly: Good for stepping into robotics — you assemble the chassis, wire up the sensors, program the controller, build code for line-tracking or obstacle-avoidance.
-
Upgrade flexibility: Because it uses standard modules (Arduino board, motor driver, standard sensors) you can expand it — add Bluetooth/WiFi, additional sensors, etc.
Typical Specifications (based on listing)
Here are the representative specifications for this kit (verify exact model you buy):
| Spec | Value |
|---|---|
| Gear motor reduction | 48:1 (default) or optionally 120:1 for slower, high-torque motion. |
| Motor count | Two DC gear motors for drive (one per wheel) plus a caster wheel for balance. |
| Wheels | Two main drive wheels plus one support wheel (caster). |
| Chassis material | High-intensity black acrylic (mounting plates, spacers) for durability. |
| Control board | Arduino-style “R3 CH340” board included. |
| Motor driver module | L298N dual motor driver included. |
| Sensors included | Ultrasonic distance module for avoidance; encoder discs for speed/rotation detection. |
| Power supply | Comes with a four-battery box and rocker switch for on/off. |
| Target use | Compatible with Arduino projects; supports line tracking/obstacle avoidance. |
Applications
This kit is well suited for:
-
Educational robotics courses: students build the car, learn coding (Arduino C++), sensor integration (ultrasonic, encoders) and robotics logic.
-
DIY hobby projects: you can take the chassis and build your own custom robot car (e.g., remote control, autonomous, Bluetooth/phone control).
-
Prototyping small mobile robots for research/hobby: you have the drive base and sensors already, you focus on programming and additional features.
-
Competitions or maker fairs: such as line-tracking races, obstacle avoidance challenges, etc.
Practical Tips for Best Use
Here are some helpful tips to get the best from your kit:
-
Ensure motor gearing matches your application: If you want speed, you might choose the 48:1 version; if you want stronger torque and slower motion (e.g., climb slope) go for 120:1.
-
Check wiring before powering: Make sure the motor driver L298N is wired correctly (enable lines, motor outputs, power supply) and ground common with Arduino board.
-
Sensor mounting orientation matters: The ultrasonic sensor must face forward/clear of obstacles. The encoder discs must be aligned properly with the motors so the sensors detect pulses correctly.
-
Use appropriate power supply: Make sure your battery box can provide sufficient current for motors + Arduino + sensors. Under-voltage can cause resets or stalling.
-
Test with simple sketches first: Start with basic motion (forward/backward/turn) then add sensor logic (if distance < threshold turn) then encoder count etc.
-
Avoid mechanical slack: Ensure wheel mounts, caster, chassis screws & spacers are secure—loose parts can degrade tracking or cause wobble.
-
Upgrade gradually: For example add Bluetooth (HC-05) or WiFi (ESP-8266) so you can control it from a phone. Add more sensors (IR line sensors) for line tracking.
-
Debug encoder data: Print encoder counts in Serial Monitor to verify the discs/optosensors are working reliably before building advanced logic.
-
Document your build: Keep track of motor specs (voltage, current), gear ratio, wheel diameter so you can compute linear speed (useful for control).
-
Have fun & iterate: Try different algorithms (e.g., PID line tracking, obstacle avoidance using ultrasonic + IR) and reuse the chassis for other robot experiments.


There are no reviews yet.