


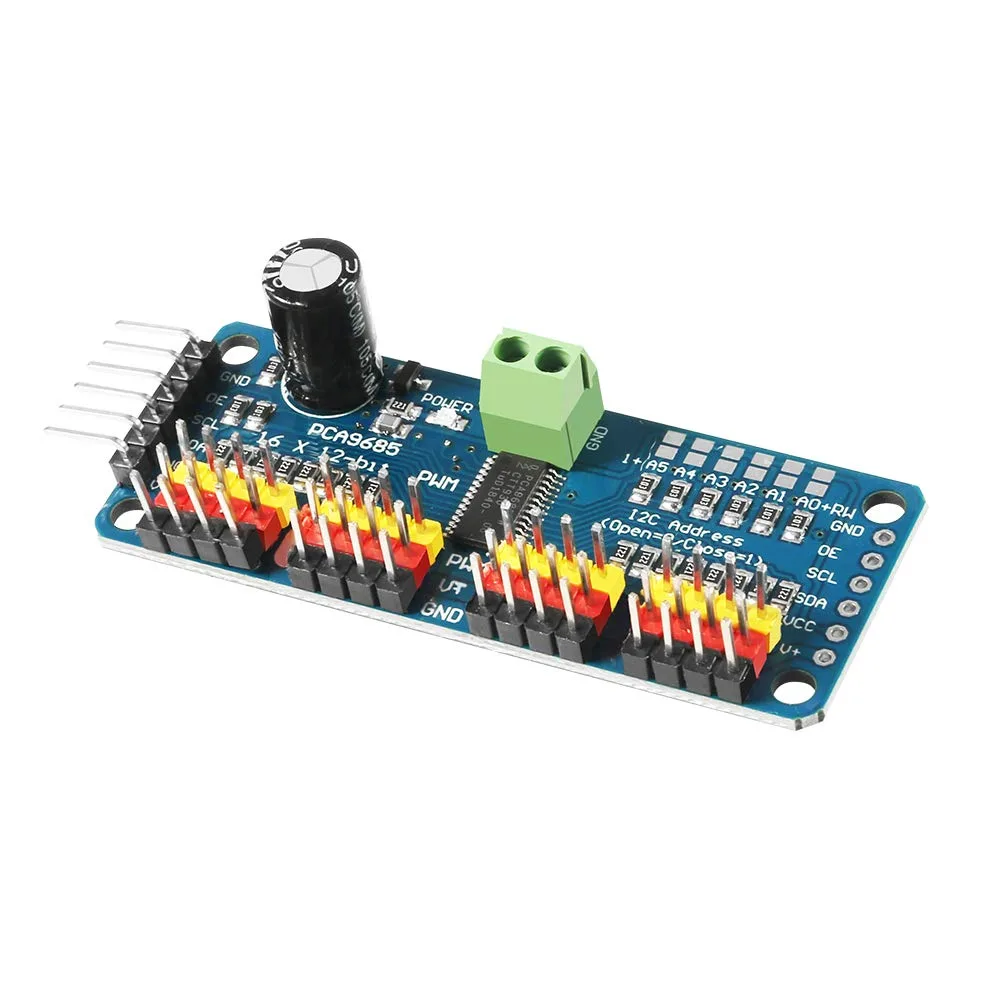
- Dimensions (no headers or terminal block) 2.5″ x 1″ x 0.1″ (62.5mm x 25.4mm x 3mm)
- Weight (no headers or terminal block): 5.5grams
- Weight (with 3×4 headers & terminal block): 9grams
- This board/chip uses I2C 7-bit address between 0x60-0x80, selectable with jumpers.
- Terminal block for power input (or you can use the 0.1″ breakouts on the side)
- Reverse polarity protection on the terminal block input
- Green power-good LED
- 3 pin connectors in groups of 4 so you can plug in 16 servos at once (Servo plugs are slightly wider than 0.1″ so you can only stack 4 next to each other on 0.1″ header
- “Chain-able” design
- A spot to place a big capacitor on the V+ line (in case you need it)
- 220-ohm series resistors on all the output lines to protect them, and to make driving LEDs trivial.
- Solder jumpers for the 6 address select pins.
- i2c-controlled PWM driver with a built-in clock. Unlike the TLC5940 family, you do not need to continuously send it signal tying up your microcontroller, its completely free running!
- It is 5V compliant, which means you can control it from a 3.3V microcontroller and still safely drive up to 6V outputs (this is good for when you want to control white or blue LEDs with 3.4+ forward voltages)
- 6 address select pins so you can wire up to 62 of these on a single i2c bus, a total of 992 outputs – that’s a lot of servos or LEDs
- Adjustable frequency PWM up to about 1.6 KHz
- 12-bit resolution for each output – for servos, that means about 4us resolution at 60Hz update rate
- Configurable push-pull or open-drain output
- Output enable pin to quickly disable all the outputs.
- (1) Drive board connected to Arduino:
- The PWM driver board uses the I2C method, so only four lines can be connected to the Arduino device:
- “Classic” Arduino pin mode:
- + 5v -> VCC
- GND -> GND
- Analog 4 -> SDA
- Analog 5 -> SCL
- Old Mega pin way:
- + 5v -> VCC
- GND -> GND
- Digital 20 -> SDA
- Digital 21 -> SCL
- R3 and later Arduino pin method (Uno, Mega &
- Leonardo):
- (These boards have dedicated SDA and SCL pins)
- + 5v -> VCC
- GND -> GND
- SDA -> SDA
- SCL -> SCL
- VCC pin is only for the chip power supply, if you want to connect the servo or LED lights, use the V + pin power supply, V + pin supports 3.3 ~ 6V power supply (chip safe voltage 5V). It is recommended to connect the external power supply via the power supply terminal.
- (2) power supply part:
- Most of the servo design voltage is 5 ~ 6V, especially in a number of steering gear at the same time running, with the need for high-power power supply. If you are directly using the Arduino 5V pin to power the servo directly, there are some unpredictable problems, so we recommend that you have a suitable external power supply for the drive board.
- (3) Connect the servo:
- Most servos are connected using standard 3-wire female plugs, as long as the corresponding pin into the driver board on it. (Ground wire is generally black or brown, the signal line is generally yellow or white)
- (4) for the driver board assigned address:

There are no reviews yet.